Speaker နှင့် participant နှစ်ဖက်စလုံး internet ပတ်ဝန်းကျင် လိုအပ်ပါသည်။ Internet speed ကို https://fast.com/ တွင် စစ်ဆေးနိုင်ပါသည်။
- 30mbps သို့မဟုတ် ထို့ထက်မြင့်သော internet ပတ်ဝန်းကျင် အကြံပြုပါသည်
- အနည်းဆုံး 10mbps internet ပတ်ဝန်းကျင် လိုအပ်ပါသည်
ကိရိယာများ အသုံးပြုပြီး တိကျသော Transcription နှင့် Translation ရရှိနည်း
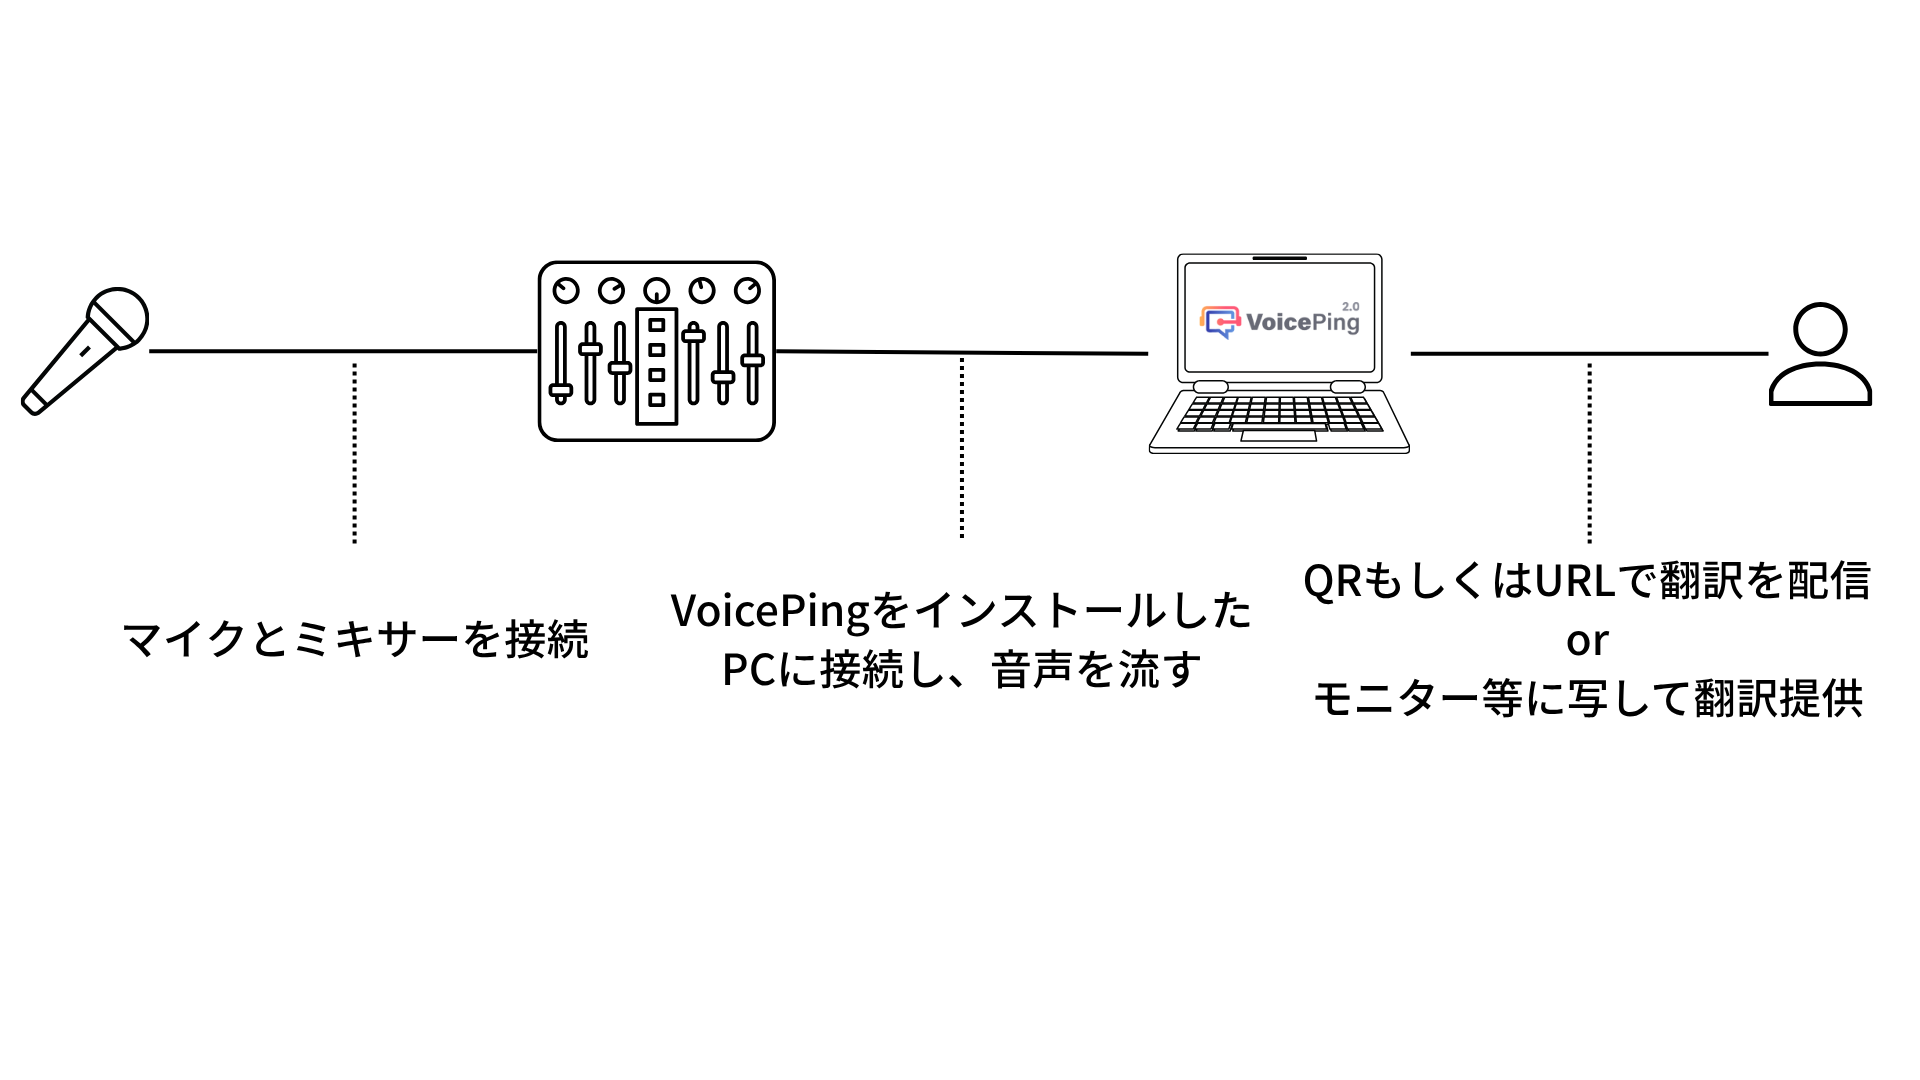
PC ရှေ့တွင် ပြောဆိုသော format ရှိ web events/webinars များအတွက် ဤအရာ မလိုအပ်ပါ။ VoicePing ကို web meetings များအတွက်လည်း ပုံမှန်အတိုင်း အသုံးပြုပြီး PC microphone ဖြင့်ပင် high-precision transcription နှင့် translation ဖြစ်နိုင်ပါသည်။ သို့သော် events များတွင် ဆူညံသံနှင့် howling ကြောင့် accuracy ကျဆင်းနိုင်ပါသည်။ ထို့ကြောင့် audio interface သုံးရန် အကြံပြုပါသည်။ အသေးစိတ်အတွက် Audio Mixer Setup Method ကို ကြည့်ပါ။QR Code/URL မှတစ်ဆင့် Subtitles ဖြန့်ဝေသောအခါ
ပြင်ဆင်ခြင်း
-
Webinar host ဘက်တွင် VoicePing ထည့်သွင်းပြီး virtual office mode သို့ ရွှေ့ပြီး meeting room ဖန်တီးပါ။
- VoicePing ၏ virtual office mode ဖွင့်ထားကြောင်း အတည်ပြုပါ
- Desktop app အစား web browser မှ အသုံးပြုပါက သင့် status အတွက် web virtual office mode ရနိုင်မရနိုင် စစ်ဆေးပါ
-
Meeting room ဖန်တီးပြီးနောက် meeting room settings မှ listener web app ကို enable လုပ်ပါ။
- Listener web app enable လုပ်သောအခါ webinar participants များ ဝင်ရောက်နိုင်သော QR code/URL ရရှိနိုင်ပါသည်
- “Enable listener microphone” option off ဖြစ်ကြောင်း အတည်ပြုပါ
Practice/Live
- Listener mode QR code သို့မဟုတ် URL ကို customers များထံ ဖြန့်ဝေပြီး participation ကို တိုက်တွန်းပါ။
- Webinar speakers များကို ပြင်ဆင်မှုတွင် ဖန်တီးထားသော meeting room သို့ VoicePing regular users သို့မဟုတ် web guests အဖြစ် ဖိတ်ကြားပါ။
-
Speakers များသည် ၎င်းတို့ ပြောဆိုသော ဘာသာစကားကို recognition language အဖြစ် သတ်မှတ်နိုင်မနိုင် စစ်ဆေးပါ။
- Screen အောက်ခြေရှိ control bar မှ chat ရွေးချယ်သောအခါ ပေါ်လာသော chat box ၏ top bar မှ settings လုပ်နိုင်ပါသည်
- Speakers များ VoicePing regular users သို့မဟုတ် web guests အဖြစ် သီးခြား devices များမှ ပါဝင်ပါက မတူညီသော ဘာသာစကားများဖြင့် တစ်ပြိုင်နက် စကားပြောဆိုသော်လည်း translation ဖြစ်နိုင်ပါသည်
- VoicePing တွင် unmute လုပ်ပြီး စကားပြောစတင်ခြင်းဖြင့် transcription နှင့် translation အမှန်တကယ် စတင်ပါသည်။
OBS ဖြင့် Screen Configuration တွင် Translation Subtitles ထည့်သွင်းပြီး Youtube သို့မဟုတ် Zoom တွင် Streaming လုပ်သောအခါ
ပြင်ဆင်ခြင်း
-
Webinar host ဘက်တွင် VoicePing ၏ virtual office mode သို့ ရွှေ့ပြီး meeting room ပြင်ဆင်ပါ။
- VoicePing ၏ virtual office mode ဖွင့်ထားကြောင်း အတည်ပြုပါ
- Desktop app အစား web browser မှ အသုံးပြုပါက သင့် status အတွက် web virtual office mode ရနိုင်မရနိုင် စစ်ဆေးပါ
- ဖန်တီးထားသော meeting room သို့ ဝင်ရောက်ပြီး microphone ကို unmute လုပ်ပါ၊ screen အောက်ခြေရှိ control bar မှ chat ရွေးချယ်ပြီး ပေါ်လာသော chat box ၏ top bar မှ full-screen icon ကို နှိပ်ပါ။
-
စကားပြောစသောအခါ Subtitles ပြသပါမည်။
- Screen ညာဘက်အပေါ်မှ target translation language ကိုလည်း ပြောင်းလဲနိုင်ပါသည်
- Subtitles ပြသနေစဉ် OBS ဖြင့် screen configuration တွင် မည်သို့ ထည့်သွင်းမည်ကို စဉ်းစားပါ
Practice/Live
-
Webinar speakers များကို ပြင်ဆင်မှုတွင် ဖန်တီးထားသော meeting room သို့ VoicePing regular users သို့မဟုတ် web guests အဖြစ် ဖိတ်ကြားပါ။
- Speakers အများအပြား ရှိပါက အခြေခံအားဖြင့် speakers အားလုံး သီးခြား devices များမှ ပါဝင်သင့်ပါသည်
-
Speakers များသည် ၎င်းတို့ ပြောဆိုသော ဘာသာစကားကို recognition language အဖြစ် သတ်မှတ်နိုင်မနိုင် စစ်ဆေးပါ။
- Speakers များ သီးခြား devices များမှ ပါဝင်ပါက မတူညီသော ဘာသာစကားများဖြင့် တစ်ပြိုင်နက် စကားပြောဆိုသော်လည်း translation ဖြစ်နိုင်ပါသည်
- VoicePing တွင် unmute လုပ်ပြီး စကားပြောစတင်ခြင်းဖြင့် transcription နှင့် translation အမှန်တကယ် စတင်ပါသည်။